
G3V2 Tri-Mode Gaming Mouse User Guide
Welcome to the MCHOSE G3V2 Tri-Mode Gaming Mouse User Guide. This guide covers product specifications, connection modes, charging, LED indicators, and MCHOSE HUB configuration.
Table of Contents
- 1. Product Overview
- 2. Specifications
- 3. Connection Modes
- 4. Charging
- 5. LED Indicators
- 6. MCHOSE HUB
- 7. Button Settings
- 8. DPI Settings
- 9. Performance Settings
- 10. Firmware and Factory Reset
1. Product Overview
The MCHOSE G3V2 is a tri-mode gaming mouse designed for gaming, productivity, and everyday use.
Supported features include:
- USB Wired, 2.4GHz Wireless, and BT connections
- Configurable DPI stages
- Adjustable polling rate in supported connection modes
- Programmable buttons and macros
- Onboard storage for supported settings
- MCHOSE HUB configuration
- Firmware updates
Note: Available settings may vary depending on the connection mode, firmware version, and MCHOSE HUB version.
2. Specifications
| Item | Specification |
|---|---|
| Product | MCHOSE G3V2 Tri-Mode Gaming Mouse |
| Dimensions | 116.5 × 62.9 × 38.2 mm |
| Connection Modes | USB Wired / 2.4GHz Wireless / BT |
| Charging Interface | USB-C |
| Configuration Software | MCHOSE HUB |
Manual measurements may vary slightly. Check the product page or packaging for complete model-specific specifications.
3. Connection Modes
3.1 USB Wired Mode
- Connect the included USB-C cable to the mouse.
- Connect the USB-A end to a computer USB port.
- Wait for the computer to recognize the mouse.
USB Wired Mode provides a stable connection, allows the mouse to be used while charging, and is recommended for firmware updates
3.2 2.4GHz Wireless Mode
- Move the mode switch to 2.4GHz.
- Remove the USB receiver from its storage compartment.
- Connect the receiver to a computer USB port.
- Wait for the mouse to connect.
The mouse and receiver are paired before shipment and normally do not require manual pairing.
3.3 BT Mode
- Move the mode switch to BT.
- Open the BT settings on your computer or device.
- Search for MCHOSE G3 V2.
- Select the mouse to complete pairing.
Note: BT Mode is intended for standard mouse operation and does not support all MCHOSE HUB features. Its cursor response may feel different from USB Wired or 2.4GHz Wireless Mode.
3.4 Manual 2.4GHz Pairing
Manual pairing is only required if the mouse can no longer connect to its original receiver.
- Switch the mouse to 2.4GHz Wireless Mode.
- Press and hold the left button, scroll wheel, and right button together for approximately three seconds.
- Wait for the LED indicator to flash rapidly.
- Connect the receiver to the computer.
- Keep the mouse close to the receiver until pairing is complete.
Important: Only use the receiver and pairing procedure intended for the G3V2.
4. Charging
- Connect the included USB-C cable to the mouse.
- Connect the other end to a computer USB port.
- The mouse will begin charging automatically.
The mouse can be used in USB Wired Mode while charging.
Important: Use the included cable when possible. Do not use damaged cables or unsupported power adapters.
5. LED Indicators
The LED indicator shows connection, pairing, charging, and low-battery status.
Indicator behavior may vary depending on the connection mode and firmware version. Refer to the product markings or current MCHOSE documentation for the applicable indicator pattern.
6. MCHOSE HUB
MCHOSE HUB allows you to configure supported G3V2 features, including:
- Button assignments
- DPI stages
- Macros
- Polling rate
- Sleep settings
- Performance settings
- Firmware updates
- Factory reset
Connect the mouse in USB Wired or 2.4GHz Wireless Mode before opening MCHOSE HUB. BT Mode does not support all configuration features.
7. Button Settings
Supported buttons can be assigned to mouse actions, keyboard keys, multimedia controls, shortcuts, or macros.
- Open MCHOSE HUB and select the G3V2.
- Select the button you want to configure.
- Choose the required function.
- Apply and save the setting.
Macros
Macros allow a sequence of supported keyboard or mouse actions to be assigned to one programmable button.
Important: Some games, competitive platforms, and anti-cheat systems restrict macros. Review the applicable rules before using them.
Create a Macro
|
1.Click New Macro. |
2.Enter a name for the macro. |
|
3.Select the desired playback mode. |
4.Click Record and perform the desired actions. |
|
5.Save the recording. |
6.Drag the macro onto the desired mouse button. |
|
7.Edit delay values if needed. | |
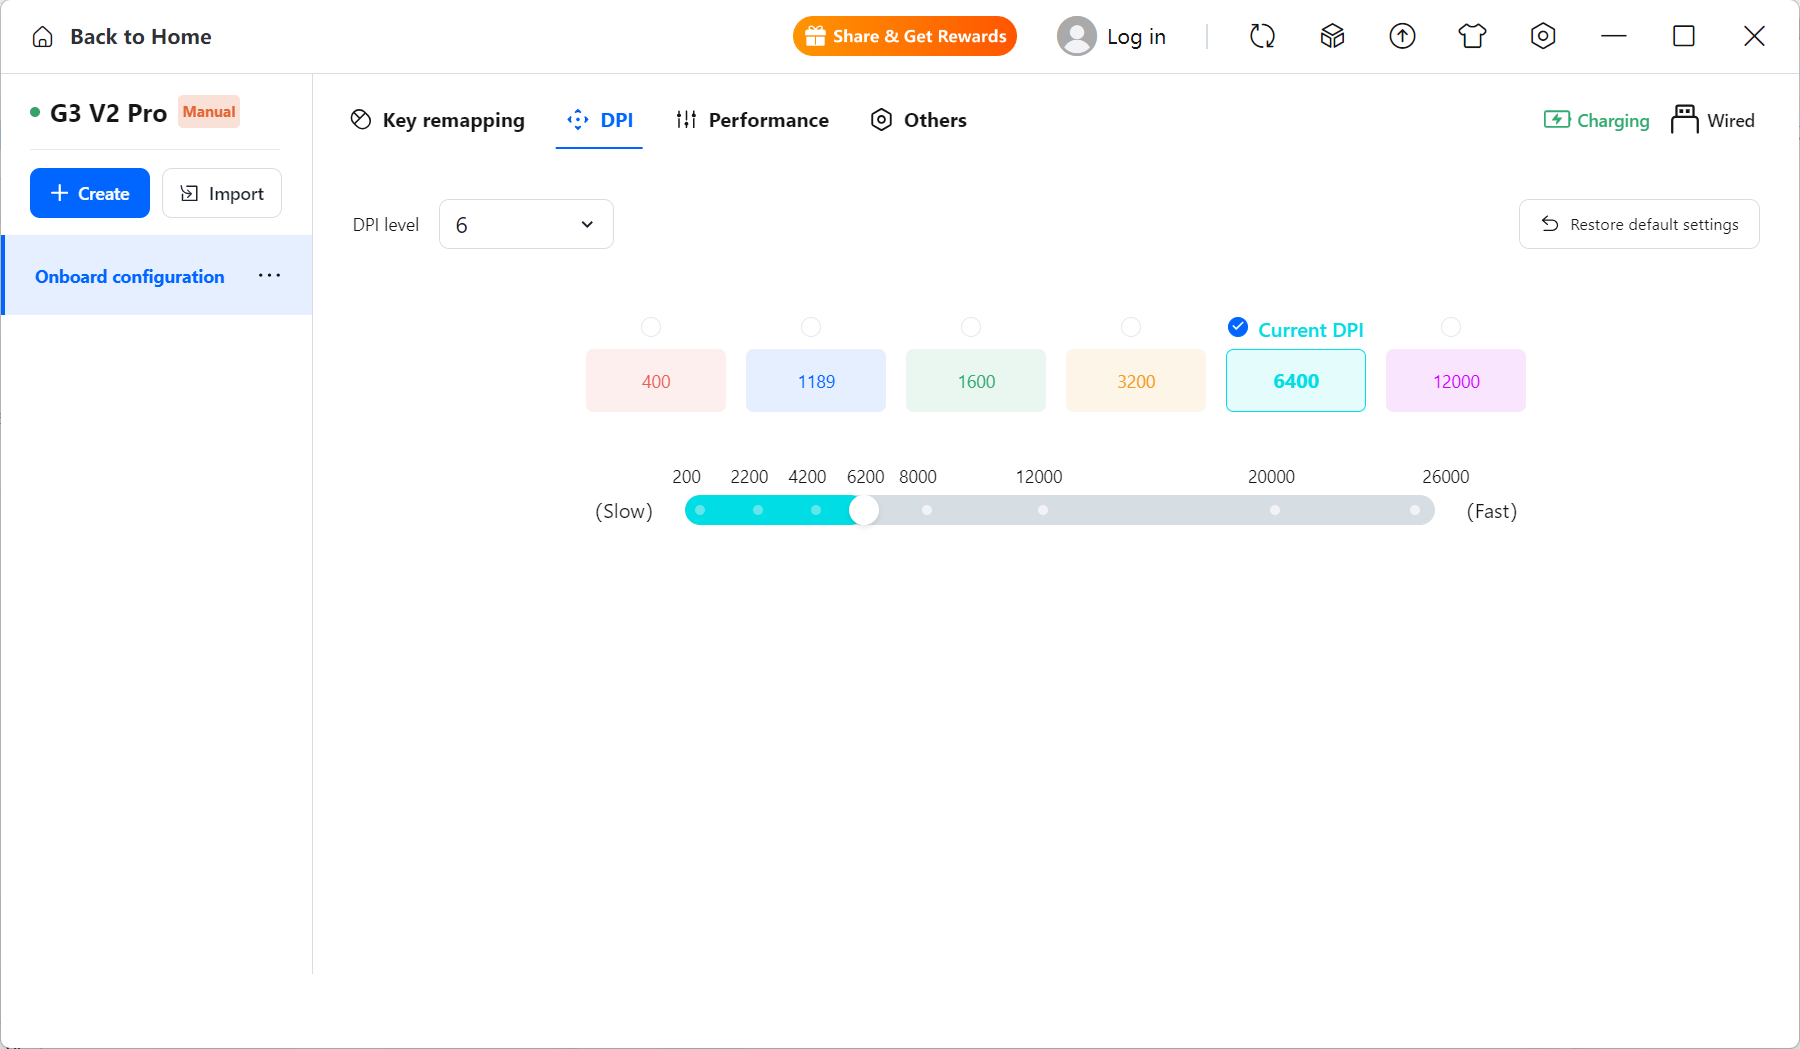
8. DPI Settings
DPI determines how far the cursor moves in response to physical mouse movement.
- A higher DPI moves the cursor farther with the same hand movement.
- A lower DPI provides slower cursor movement that some users may find easier to control.
- Multiple DPI stages can be configured and switched using the assigned DPI button.
There is no single best DPI setting. Choose a value based on your display resolution, game sensitivity, and personal preference
 9. Performance Settings
Sleep Settings
Configure the sleep timer according to your preferred balance between wake-up behavior and battery life.
Polling Rate
Polling rate is the frequency at which the mouse reports movement and button data to the computer.
| Usage | Suggested Starting Point |
|---|---|
| Office and Everyday Use | 500–1000Hz |
| Gaming | 1000Hz or higher when supported |
Higher polling rates reduce the interval between reports but may increase battery consumption and system resource usage.
Angle Snapping
Angle Snapping reduces small movement deviations to produce straighter cursor movement. It may be useful for some office or drawing tasks, while many gaming users prefer to disable it for more direct tracking.
Scroll Direction
Use MCHOSE HUB to reverse the vertical scrolling direction when supported.
10. Firmware and Factory Reset
MCHOSE HUB allows you to check the current firmware version, install supported updates, and restore default settings.
Follow the connection method and update sequence shown by MCHOSE HUB. Do not disconnect the mouse during an update.
Important: A factory reset removes supported custom settings and restores their default values.
For common usage questions, see the G3V2 Mouse FAQ & Troubleshooting Guide. For advanced software, firmware, or hardware problems, see G3V2 Driver & Hardware Issues.
Comments
0 comments
Please sign in to leave a comment.